#Change ownership of Exchange 2010 SP1 distribution list
#Author: Scott Bueffel, http://www.flobee.net
#v1.0 1/6/10
$connectToServer = 'ServerName' #Server to connect to if shell doesn't have cmdlets in memory
$DLPrefix = '[DL] ' #Display name standard prefix. If none, leave as two single-quotes
function ConnectToExchange
{
$testcmd = gcm Get-Mailbox -ErrorAction SilentlyContinue
if (-not($testcmd))
{
$statusBarPanel1.Text = 'Connecting to Exchange...'
#Connect remotely to Exchange
$global:exsession = New-PSSession -ConfigurationName Microsoft.Exchange -ConnectionUri "http://$connectToServer/PowerShell" -Name exchange
Import-PSSession $exsession -AllowClobber -DisableNameChecking | Out-Null
}
$statusBarPanel1.Text = 'Connected to Exchange'
}
#region Import the Assemblies
[reflection.assembly]::loadwithpartialname("System.Windows.Forms") | Out-Null
[reflection.assembly]::loadwithpartialname("System.Drawing") | Out-Null
#endregion
#region Generated Form Objects
$form = New-Object System.Windows.Forms.Form
$txtAddOwner = New-Object System.Windows.Forms.TextBox
$label7 = New-Object System.Windows.Forms.Label
$label6 = New-Object System.Windows.Forms.Label
$btnRemoveOwner = New-Object System.Windows.Forms.Button
$btnAddOwner = New-Object System.Windows.Forms.Button
$lstOwners = New-Object System.Windows.Forms.ListBox
$label2 = New-Object System.Windows.Forms.Label
$label1 = New-Object System.Windows.Forms.Label
$btnGetOwner = New-Object System.Windows.Forms.Button
$statusBar1 = New-Object System.Windows.Forms.StatusBar
$btnCancel = New-Object System.Windows.Forms.Button
$btnApply = New-Object System.Windows.Forms.Button
$label5 = New-Object System.Windows.Forms.Label
$txtDLName = New-Object System.Windows.Forms.TextBox
$label4 = New-Object System.Windows.Forms.Label
$label3 = New-Object System.Windows.Forms.Label
$toolTip1 = New-Object System.Windows.Forms.ToolTip
$statusBarPanel1 = New-Object System.Windows.Forms.StatusBarPanel
$statusBarPanel2 = New-Object System.Windows.Forms.StatusBarPanel
$InitialFormWindowState = New-Object System.Windows.Forms.FormWindowState
$errorprovider = New-Object System.Windows.Forms.ErrorProvider
#endregion Generated Form Objects
function DisplayOwners ($DL)
{
$lstOwners.BeginUpdate()
[array]$DLOwners = $DL.ManagedBy
foreach ($owner in $DLOwners)
{
$lstOwners.Items.Add($owner.ToString().Substring($owner.ToString().LastIndexOf('/') + 1))
}
$lstOwners.EndUpdate()
$txtAddOwner.Enabled = $true
}
function RetrieveDL
{
$lstOwners.Items.Clear() #Remove any entries in owner list from previous query
$btnAddOwner.Enabled = $false
$txtAddOwner.Enabled = $false
$statusBarPanel2.Text = 'Searching for DL...'
$DLDisplayName = "$($DLPrefix)$($txtDLName.Text)"
$script:DL = Get-DistributionGroup $DLDisplayName -ErrorAction SilentlyContinue
if (!($DL))
{
$errorProvider.SetError($txtDLName, 'The DL cannot be found.')
$statusBarPanel2.Text = 'DL not found.'
return
}
#Valid DL returned
$errorProvider.SetError($txtDLName, '')
DisplayOwners $DL
$statusBarPanel2.Text = ''
$btnCancel.Text = 'Cancel'
}
function AddOwner_OnClick ($username)
{
$statusBarPanel2.Text = 'Validating user...'
$ownerMailbox = Get-Mailbox $username -ErrorAction SilentlyContinue
if (!($ownerMailbox))
{
$errorprovider.SetIconAlignment($txtAddOwner,2)
$errorprovider.SetError($txtAddOwner, 'The user cannot be found.')
$statusBarPanel2.Text = 'User not found.'
return
}
elseif ($lstOwners.Items.Contains($username))
{
$errorprovider.SetIconAlignment($txtAddOwner,2)
$errorprovider.SetError($txtAddOwner, 'The user is already in the list.')
$statusBarPanel2.Text = 'User already is owner.'
return
}
#Valid user found
$lstOwners.Items.Insert(0,$username) #Add owner to top of list
$statusBarPanel2.Text = 'User added.'
$errorprovider.SetIconAlignment($txtAddOwner,3)
$errorprovider.SetError($txtAddOwner,'')
$txtAddOwner.Text = ''
$btnApply.Enabled = $true
}
function ToggleAddButton ($username)
{
if ($username.Length -gt 0)
{
$btnAddOwner.Enabled = $true
}
else
{
$btnAddOwner.Enabled = $false
}
}
function RemoveOwner_OnClick ($owner)
{
$lstOwners.Items.Remove($owner)
$btnRemoveOwner.Enabled = $false
$btnApply.Enabled = $true
}
function ApplyChanges_OnClick
{
[array]$newOwners = $lstOwners.Items
try
{
Set-DistributionGroup $($DL.DisplayName) -ManagedBy $newOwners -BypassSecurityGroupManagerCheck -ErrorAction Stop
$statusBarPanel2.Text = 'DL ownership applied.'
$errorprovider.SetError($btnApply, '')
$btnCancel.Text = 'Close'
$btnApply.Enabled = $false
}
catch
{
$statusBarPanel2.Text = 'Error occurred updating DL.'
$errorprovider.SetError($btnApply, "Error occurred when updating the DL's new ownership.")
}
}
$OnLoadForm_StateCorrection = {$form.WindowState = $InitialFormWindowState}
#region Generated Form Code
$form.CancelButton = $btnCancel
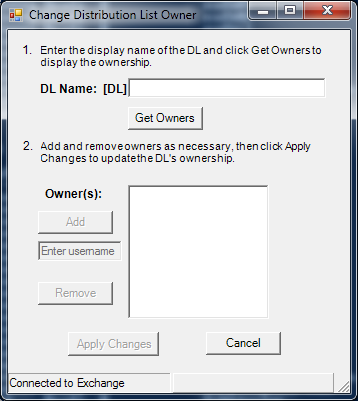
$form.Text = "Change Distribution List Owner"
$form.Name = "form"
$form.KeyPreview = $True
$form.StartPosition = 1
$form.DataBindings.DefaultDataSourceUpdateMode = 0
$System_Drawing_Size = New-Object System.Drawing.Size
$System_Drawing_Size.Width = 342
$System_Drawing_Size.Height = 363
$form.ClientSize = $System_Drawing_Size
$System_Drawing_Size = New-Object System.Drawing.Size
$System_Drawing_Size.Width = 84
$System_Drawing_Size.Height = 20
$txtAddOwner.Size = $System_Drawing_Size
$txtAddOwner.DataBindings.DefaultDataSourceUpdateMode = 0
$txtAddOwner.Text = "Enter username"
$txtAddOwner.Name = "txtAddOwner"
$System_Drawing_Point = New-Object System.Drawing.Point
$System_Drawing_Point.X = 30
$System_Drawing_Point.Y = 211
$txtAddOwner.Location = $System_Drawing_Point
$txtAddOwner.Enabled = $False
$txtAddOwner.TabIndex = 15
$txtAddOwner.add_Enter({if ($txtAddOwner.Text -eq 'Enter username') {$txtAddOwner.Text = ''}})
$txtAddOwner.add_KeyUp({ToggleAddButton $txtAddOwner.Text})
$txtAddOwner.add_KeyDown({if ($_.KeyCode -eq "Enter"){AddOwner_OnClick $txtAddOwner.Text}})
$form.Controls.Add($txtAddOwner)
$label7.TabIndex = 12
$System_Drawing_Size = New-Object System.Drawing.Size
$System_Drawing_Size.Width = 20
$System_Drawing_Size.Height = 23
$label7.Size = $System_Drawing_Size
$label7.Text = "2."
$label7.Font = New-Object System.Drawing.Font("Arial",9,0,3,0)
$System_Drawing_Point = New-Object System.Drawing.Point
$System_Drawing_Point.X = 13
$System_Drawing_Point.Y = 108
$label7.Location = $System_Drawing_Point
$label7.DataBindings.DefaultDataSourceUpdateMode = 0
$label7.Name = "label7"
$form.Controls.Add($label7)
$label6.TabIndex = 13
$System_Drawing_Size = New-Object System.Drawing.Size
$System_Drawing_Size.Width = 283
$System_Drawing_Size.Height = 35
$label6.Size = $System_Drawing_Size
$label6.Text = "Add and remove owners as necessary, then click Apply Changes to update the DL's ownership."
$label6.Font = New-Object System.Drawing.Font("Arial",8,0,3,0)
$System_Drawing_Point = New-Object System.Drawing.Point
$System_Drawing_Point.X = 30
$System_Drawing_Point.Y = 109
$label6.Location = $System_Drawing_Point
$label6.DataBindings.DefaultDataSourceUpdateMode = 0
$label6.Name = "label6"
$form.Controls.Add($label6)
$btnRemoveOwner.TabIndex = 7
$btnRemoveOwner.Name = "btnRemoveOwner"
$btnRemoveOwner.Enabled = $False
$System_Drawing_Size = New-Object System.Drawing.Size
$System_Drawing_Size.Width = 75
$System_Drawing_Size.Height = 23
$btnRemoveOwner.Size = $System_Drawing_Size
$btnRemoveOwner.UseVisualStyleBackColor = $True
$btnRemoveOwner.Text = "Remove"
$System_Drawing_Point = New-Object System.Drawing.Point
$System_Drawing_Point.X = 30
$System_Drawing_Point.Y = 252
$btnRemoveOwner.Location = $System_Drawing_Point
$btnRemoveOwner.DataBindings.DefaultDataSourceUpdateMode = 0
$btnRemoveOwner.add_Click({RemoveOwner_OnClick $lstOwners.SelectedItem})
$form.Controls.Add($btnRemoveOwner)
$btnAddOwner.TabIndex = 6
$btnAddOwner.Name = "btnAddOwner"
$btnAddOwner.Enabled = $False
$System_Drawing_Size = New-Object System.Drawing.Size
$System_Drawing_Size.Width = 75
$System_Drawing_Size.Height = 23
$btnAddOwner.Size = $System_Drawing_Size
$btnAddOwner.UseVisualStyleBackColor = $True
$btnAddOwner.Text = "Add"
$System_Drawing_Point = New-Object System.Drawing.Point
$System_Drawing_Point.X = 30
$System_Drawing_Point.Y = 181
$btnAddOwner.Location = $System_Drawing_Point
$btnAddOwner.DataBindings.DefaultDataSourceUpdateMode = 0
$btnAddOwner.add_Click({AddOwner_OnClick $txtAddOwner.Text})
$form.Controls.Add($btnAddOwner)
$lstOwners.FormattingEnabled = $True
$System_Drawing_Size = New-Object System.Drawing.Size
$System_Drawing_Size.Width = 141
$System_Drawing_Size.Height = 134
$lstOwners.Size = $System_Drawing_Size
$lstOwners.DataBindings.DefaultDataSourceUpdateMode = 0
$lstOwners.Name = "lstOwners"
$System_Drawing_Point = New-Object System.Drawing.Point
$System_Drawing_Point.X = 120
$System_Drawing_Point.Y = 155
$lstOwners.Location = $System_Drawing_Point
$lstOwners.TabIndex = 5
$lstOwners.add_SelectedIndexChanged({$btnRemoveOwner.Enabled = $true})
$form.Controls.Add($lstOwners)
$label2.TabIndex = 10
$System_Drawing_Size = New-Object System.Drawing.Size
$System_Drawing_Size.Width = 21
$System_Drawing_Size.Height = 23
$label2.Size = $System_Drawing_Size
$label2.Text = "1."
$label2.Font = New-Object System.Drawing.Font("Arial",9,0,3,0)
$System_Drawing_Point = New-Object System.Drawing.Point
$System_Drawing_Point.X = 12
$System_Drawing_Point.Y = 12
$label2.Location = $System_Drawing_Point
$label2.DataBindings.DefaultDataSourceUpdateMode = 0
$label2.Name = "label2"
$form.Controls.Add($label2)
$label1.TabIndex = 11
$System_Drawing_Size = New-Object System.Drawing.Size
$System_Drawing_Size.Width = 288
$System_Drawing_Size.Height = 32
$label1.Size = $System_Drawing_Size
$label1.Text = "Enter the display name of the DL and click Get Owners to display the ownership."
$label1.Font = New-Object System.Drawing.Font("Arial",8,0,3,0)
$System_Drawing_Point = New-Object System.Drawing.Point
$System_Drawing_Point.X = 30
$System_Drawing_Point.Y = 13
$label1.Location = $System_Drawing_Point
$label1.DataBindings.DefaultDataSourceUpdateMode = 0
$label1.Name = "label1"
$form.Controls.Add($label1)
$btnGetOwner.TabIndex = 3
$btnGetOwner.Name = "btnGetOwner"
$System_Drawing_Size = New-Object System.Drawing.Size
$System_Drawing_Size.Width = 75
$System_Drawing_Size.Height = 23
$btnGetOwner.Size = $System_Drawing_Size
$btnGetOwner.UseVisualStyleBackColor = $True
$btnGetOwner.Text = "Get Owners"
$System_Drawing_Point = New-Object System.Drawing.Point
$System_Drawing_Point.X = 120
$System_Drawing_Point.Y = 77
$btnGetOwner.Location = $System_Drawing_Point
$btnGetOwner.DataBindings.DefaultDataSourceUpdateMode = 0
$btnGetOwner.add_Click({RetrieveDL})
$form.Controls.Add($btnGetOwner)
$statusBar1.ShowPanels = $True
$System_Drawing_Size = New-Object System.Drawing.Size
$System_Drawing_Size.Width = 342
$System_Drawing_Size.Height = 22
$statusBar1.Size = $System_Drawing_Size
$statusBar1.TabIndex = 14
$System_Drawing_Point = New-Object System.Drawing.Point
$System_Drawing_Point.X = 0
$System_Drawing_Point.Y = 341
$statusBar1.Location = $System_Drawing_Point
$statusBar1.DataBindings.DefaultDataSourceUpdateMode = 0
$statusBar1.Name = "statusBar1"
$statusBar1.Panels.Add($statusBarPanel1)|Out-Null
$statusBar1.Panels.Add($statusBarPanel2)|Out-Null
$form.Controls.Add($statusBar1)
$btnCancel.TabIndex = 9
$btnCancel.Name = "btnCancel"
$System_Drawing_Size = New-Object System.Drawing.Size
$System_Drawing_Size.Width = 75
$System_Drawing_Size.Height = 23
$btnCancel.Size = $System_Drawing_Size
$btnCancel.UseVisualStyleBackColor = $True
$btnCancel.Text = "Cancel"
$System_Drawing_Point = New-Object System.Drawing.Point
$System_Drawing_Point.X = 198
$System_Drawing_Point.Y = 302
$btnCancel.Location = $System_Drawing_Point
$btnCancel.DataBindings.DefaultDataSourceUpdateMode = 0
$btnCancel.DialogResult = 2
$form.Controls.Add($btnCancel)
$btnApply.TabIndex = 8
$btnApply.AutoSize = $True
$btnApply.Name = "btnApply"
$btnApply.Enabled = $False
$System_Drawing_Size = New-Object System.Drawing.Size
$System_Drawing_Size.Width = 88
$System_Drawing_Size.Height = 23
$btnApply.Size = $System_Drawing_Size
$btnApply.UseVisualStyleBackColor = $True
$btnApply.Text = "Apply Changes"
$System_Drawing_Point = New-Object System.Drawing.Point
$System_Drawing_Point.X = 60
$System_Drawing_Point.Y = 302
$btnApply.Location = $System_Drawing_Point
$btnApply.DataBindings.DefaultDataSourceUpdateMode = 0
$btnApply.add_Click({ApplyChanges_OnClick})
$form.Controls.Add($btnApply)
$label5.TabIndex = 4
$System_Drawing_Size = New-Object System.Drawing.Size
$System_Drawing_Size.Width = 66
$System_Drawing_Size.Height = 23
$label5.Size = $System_Drawing_Size
$label5.Text = "Owner(s):"
$label5.Font = New-Object System.Drawing.Font("Arial",9,1,3,1)
$System_Drawing_Point = New-Object System.Drawing.Point
$System_Drawing_Point.X = 35
$System_Drawing_Point.Y = 156
$label5.Location = $System_Drawing_Point
$label5.DataBindings.DefaultDataSourceUpdateMode = 0
$label5.Name = "label5"
$form.Controls.Add($label5)
$System_Drawing_Size = New-Object System.Drawing.Size
$System_Drawing_Size.Width = 198
$System_Drawing_Size.Height = 20
$txtDLName.Size = $System_Drawing_Size
$txtDLName.DataBindings.DefaultDataSourceUpdateMode = 0
$txtDLName.MaxLength = 255
$txtDLName.Name = "txtDLName"
$System_Drawing_Point = New-Object System.Drawing.Point
$System_Drawing_Point.X = 120
$System_Drawing_Point.Y = 48
$txtDLName.Location = $System_Drawing_Point
$txtDLName.TabIndex = 2
$txtDLName.add_KeyDown({if ($_.KeyCode -eq "Enter"){RetrieveDL}})
$form.Controls.Add($txtDLName)
$label4.TabIndex = 1
$System_Drawing_Size = New-Object System.Drawing.Size
$System_Drawing_Size.Width = 103
$System_Drawing_Size.Height = 23
$label4.Size = $System_Drawing_Size
$label4.Text = "DL Name: $DLPrefix"
$label4.Font = New-Object System.Drawing.Font("Arial",9,1,3,1)
$System_Drawing_Point = New-Object System.Drawing.Point
$System_Drawing_Point.X = 30
$System_Drawing_Point.Y = 51
$label4.Location = $System_Drawing_Point
$label4.DataBindings.DefaultDataSourceUpdateMode = 0
$label4.Name = "label4"
$form.Controls.Add($label4)
$label3.TabIndex = 2
$System_Drawing_Size = New-Object System.Drawing.Size
$System_Drawing_Size.Width = 10
$System_Drawing_Size.Height = 23
$label3.Size = $System_Drawing_Size
$label3.Text = "."
$System_Drawing_Point = New-Object System.Drawing.Point
$System_Drawing_Point.X = 138
$System_Drawing_Point.Y = 13
$label3.Location = $System_Drawing_Point
$label3.DataBindings.DefaultDataSourceUpdateMode = 0
$label3.Name = "label3"
$form.Controls.Add($label3)
$toolTip1.ShowAlways = $True
$toolTip1.IsBalloon = $True
$statusBarPanel1.Name = "statusBarPanel1"
$statusBarPanel1.Text = "Connecting to Exchange..."
$statusBarPanel1.AutoSize = 2
$statusBarPanel1.Width = 162
$statusBarPanel2.Name = "statusBarPanel2"
$statusBarPanel2.Text = ""
$statusBarPanel2.AutoSize = 2
$statusBarPanel2.Width = 162
$statusBarPanel2.BorderStyle = 2
$toolTip1.ShowAlways = $True
$toolTip1.IsBalloon = $True
$toolTip1.AutomaticDelay = 250
$toolTip1.AutoPopDelay = 5000
$toolTip1.ToolTipIcon = [System.Windows.Forms.ToolTipIcon]::Info
$txtOwnersTip = "Enter the username of someone to be added as an owner."
$txtDLNameTip = "The display name of the DL as it appears in the address book."
$toolTip1.SetToolTip($txtDLName,$txtDLNameTip)
$toolTip1.SetToolTip($txtAddOwner,$txtOwnersTip)
#endregion Generated Form Code
$OnLoadForm_StateCorrection = {$form.WindowState = $InitialFormWindowState}
$InitialFormWindowState = $form.WindowState
$form.add_Load($OnLoadForm_StateCorrection)
$form.add_Shown({$form.Activate();ConnectToExchange}) #Action when form is displayed
#Show the Form
[void] $form.ShowDialog()