<#
.Parameter UserPrincipalName
UPN of the user whose actions to report
.Parameter StartDate
Beginning of search window in audit logs. Defaults to seven days (and current time) ago.
.Parameter EndDate
End of search window in audit logs. Defaults to current date/time.
.Parameter PassThru
Switch to have the output objects sent to the pipeline instead of the screen.
.Parameter ShowNonMatches
Whether a check that does not return any items should say so in the screen output.
Defaults to False
.Example
.\Get-O365PersistenceActions.ps1 johndoe@contoso.com
.Example
.\Get-O365PersistenceActions.ps1 johndoe@contoso.com -StartDate (Get-Date).AddDays(-14)
.Notes
Version: 1.0
Date: 12/21/18
#>
[CmdletBinding()]
param (
[parameter(Mandatory=$true,ValueFromPipeline=$true,Position=0)]
[ValidateScript({ForEach-Object{if ((Get-Mailbox -Identity $_) -and (Get-AzureADUser -ObjectId $_)) {$true}
else {throw "Either you are not connected to Exchange Online and Azure AD, or $_ is not a valid UPN and mailbox identity."}}
})]
[Alias("Identity")][string]$UserPrincipalName,
[parameter(Mandatory=$false)][datetime]$StartDate = (Get-Date).AddDays(-7),
[parameter(Mandatory=$false)][datetime]$EndDate = (Get-Date),
[switch]$PassThru,
[switch]$ShowNonMatches
)
$useGraphApi = $false #Set to true if script is registered in AAD, and appId and clientSecret values are populated
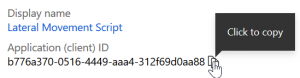
$appId = '' #Will be a 36-character string (GUID)
$clientSecret = '' #Will be a random-length string
$tenantDomain = 'contoso.onmicrosoft.com' #Your tenant's default routing domain, always ends with onmicrosoft.com
#requires -Module AzureAD
function Write-ProgressHelper ($activity)
{
Write-Progress -Activity "Checking for persistence by account $UserPrincipalName" -Status 'Overall Progress' `
-CurrentOperation $activity -PercentComplete ((($script:step++)/$totalSteps)*100) -Id 1
}
function Get-AccessToken
{
$resourceUri = 'https://graph.microsoft.com'
$body = @{grant_type='client_credentials';resource=$resourceUri;client_id=$appId;client_secret=$clientSecret}
Invoke-RestMethod -Method Post -Uri https://login.windows.net/$tenantDomain/oauth2/token?api-version=1.0 -Body $body
}
function Get-GraphData ($queryType, $filter)
{
$formattedStart = "{0:s}" -f $StartDate + 'Z'
$formattedEnd = "{0:s}" -f $EndDate + 'Z'
$baseUri = 'https://graph.microsoft.com/'
if ($queryType -eq 'DirAudits')
{
$path = 'beta/auditLogs/directoryAudits'
$dateFilter = " and activityDateTime gt $formattedStart and activityDateTime lt $formattedEnd"
}
elseif ($queryType -eq 'SignIns')
{
$path = 'beta/auditLogs/signIns'
$queryParameter = '?$top=1'
}
elseif ($queryType -eq 'AppGrants')
{
$path = 'beta/oAuth2PermissionGrants'
}
elseif ($queryType -eq 'AppAssignments')
{
$path = "beta/users/$UserPrincipalName/appRoleAssignments"
}
$fullUri = $baseUri + $path + $queryParameter + $filter + $dateFilter
$headerParams = @{'Authorization'="$($accessToken.token_type) $($accessToken.access_token)"}
#Suppress Invoke-WebRequest's own progress bar
$originalProgPref = $ProgressPreference
$ProgressPreference = 'SilentlyContinue'
$rawResponse = Invoke-WebRequest -UseBasicParsing -Headers $headerParams -Uri $fullUri -Method Get
$response = ConvertFrom-Json -InputObject $rawResponse.Content
$values = $response.value
$moreURL = $values."@odata.nextLink"
if ($moreURL -ne $null)
{
do
{
$moreRawResponse = Invoke-WebRequest -UseBasicParsing -Headers $headerParams `
-Uri $moreURL.ToString() -Method Get -ErrorAction SilentlyContinue
$moreResponse = ConvertFrom-Json -InputObject $moreRawResponse.Content
$values += $moreResponse.value
$moreURL = $moreResponse."@odata.nextLink"
}
while ($moreURL -ne $null)
}
$ProgressPreference = $originalProgPref
return $values
}
#region LM Check Functions
function Get-MailboxRules
{
Write-ProgressHelper -Activity 'Checking Inbox rules for forwarding'
#Get all inbox rules that forward or send a text message
$rules = Get-InboxRule -Mailbox $UserPrincipalName | Where-Object {(($_.ForwardTo) -or (
$_.ForwardAsAttachmentTo) -or ($_.RedirectTo) -or ($_.SendTextMessageNotificationTo))}
if ($rules)
{
#Search admin audit log for rules that forward that were created/modified during search window
$auditLogRules = Search-AdminAuditLog -UserIds $UserPrincipalName -Cmdlets New-InboxRule,Set-InboxRule `
-Parameters ForwardTo,RedirectTo,SendTextMessageNotificationTo -StartDate $StartDate -EndDate $EndDate
foreach ($ruleEntry in $rules)
{
$checkRuleOutput = "" | Select-Object -Property Check,User,RuleName,RuleAction,Enabled,LastModified
$checkRuleOutput.Check = 'InboxForward'
$checkRuleOutput.User = $UserPrincipalName
$checkRuleOutput.RuleName = $ruleEntry.Name
$ruleAction = @()
if ($ruleEntry.ForwardTo)
{
$ruleAction += 'ForwardTo:' + $ruleEntry.ForwardTo
}
if ($ruleEntry.RedirectTo)
{
$ruleAction += 'RedirectTo:' + $ruleEntry.RedirectTo
}
if ($ruleEntry.SendTextMessageNotificationTo)
{
$ruleAction += 'SendTextTo:' + $ruleEntry.SendTextMessageNotificationTo
}
$checkRuleOutput.RuleAction = $ruleAction
$checkRuleOutput.Enabled = $ruleEntry.Enabled
if ($auditLogRules)
{
foreach ($logEntry in $auditLogRules)
{
#Check if matching rule name exists in audit log
$propValue = $logEntry.CmdletParameters | Where-Object {$_.Name -eq 'Name'} |
Select-Object -ExpandProperty Value
if ($propValue -eq $ruleName)
{
$runDate = $logEntry.RunDate #Run date is returned in local time
break
}
else
{
$runDate = 'Unknown'
}
}
}
else
{
$runDate = 'Unknown'
}
$checkRuleOutput.LastModified = $runDate
}
$checkRuleOutput
}
else
{
if ($ShowNonMatches) {Write-Host 'InboxForward: There are no Inbox rules configured with forwarding.'}
}
}
function Get-OWAForwarding
{
Write-ProgressHelper -Activity 'Checking OWA-configured forwarding'
#Check for mail forwarding via ForwardingSMTPAddress
$mb = Get-Mailbox -Identity $UserPrincipalName
$checkForwardOutput = "" | Select-Object -Property Check,User,ForwardAddress,LastModified
$checkForwardOutput.Check = 'OWAForward'
$checkForwardOutput.User = $UserPrincipalName
if ($mb.ForwardingSmtpAddress)
{
$checkForwardOutput.ForwardAddress = $mb.ForwardingAddress
#Search admin audit log to see if forwarding was set during search window
$auditLogForward = Search-AdminAuditLog -UserIds $UserPrincipalName -Cmdlets Set-Mailbox `
-Parameters ForwardingSmtpAddress -StartDate $StartDate -EndDate $EndDate
if ($auditLogForward)
{
foreach ($logEntry in $auditLogForward)
{
$propValue = $logEntry.CmdletParameters | Where-Object {$_.Name -eq 'ForwardingSmtpAddress'} |
Select-Object -ExpandProperty Value
if ($propValue -eq $mb.ForwardingSmtpAddress)
{
$runDate = $logEntry.RunDate #Run date is returned in local time
break
}
else
{
$runDate = 'Unknown'
}
}
}
else
{
$runDate = 'Unknown'
}
$checkForwardOutput.LastModified = $runDate
$checkForwardOutput
}
else
{
if ($ShowNonMatches) {Write-Host "OWAForward: There is no OWA forwarding configured."}
}
}
function Get-Consents
{
Write-ProgressHelper -Activity 'Checking user-based application consents'
if ($useGraphApi)
{
$aadUser = Get-AzureADUser -ObjectId $UserPrincipalName
#Filter on user's GUID for the assigned principal
$consentsGraphFilter = "?`$filter=PrincipalId eq `'$($aadUser.ObjectId)`'"
Write-Progress -Activity ' Getting consented applications via Graph' -Status 'Retrieving' -Id 2 -ParentId 1
#Get all applications the user has granted consent to
[array]$userGrants = Get-GraphData -queryType AppGrants -filter $consentsGraphFilter
Write-Progress -Activity ' Getting consented applications via Graph' -Id 2 -Completed
if ($userGrants)
{
Write-Progress -Activity ' Getting consent dates via Graph' -Status 'Retrieving' -Id 2 -ParentId 1
#Get all applications assigned to the user
[array]$userAppAssignments = Get-GraphData -queryType AppAssignments
Write-Progress -Activity ' Getting consent dates via Graph' -Id 2 -Completed
$consentTable = @{}
foreach ($assignment in $userAppAssignments)
{
#Hash table will contain each application's ID and when its user assignment was created
$consentTable.Add($assignment.resourceId,[datetime]$assignment.CreationTimestamp)
}
for ($i = 0; $i -le $userGrants.Count - 1; $i++)
{
Write-Progress -Activity ' Processing consented applications' -Status `
"Application $($i + 1) of $($userGrants.Count)" -Id 2 -ParentId 1
$checkGrantsOutput = "" | Select-Object -Property Check,User,Application,ConsentDate,LastAppSignIn
$checkGrantsOutput.Check = 'AppGrant'
$checkGrantsOutput.User = $UserPrincipalName
#Get application's service principal, given the client ID in the grant
$consentedApp = Get-AzureADServicePrincipal -ObjectId $userGrants[$i].ClientId
$checkGrantsOutput.Application = $consentedApp.DisplayName
Write-Progress -Activity ' Getting sign-in logs via Graph' -Status 'Retrieving' -Id 3 -ParentId 2
#Filter on the ID the application from the app's service principal
$signInGraphFilter = "&`$filter=appId eq `'$($consentedApp.appId)`'"
#Get the most recent sign-in by the application
$signInLogs = Get-GraphData -queryType 'SignIns' -filter $signInGraphFilter
Write-Progress -Activity ' Getting sign-in logs via Graph' -Id 3 -Completed
if ($signInLogs)
{
$checkGrantsOutput.LastAppSignIn = [datetime]($signInLogs.CreatedDateTime)
}
else
{
$checkGrantsOutput.LastAppSignIn = 'Unknown'
}
#Cross reference the app's ID with the hash table of application assignments
#to determine when the consent was granted
$consentDate = $consentTable[$consentedApp.objectId]
if ($consentDate)
{
$checkGrantsOutput.ConsentDate = $consentDate
}
else
{
$checkGrantsOutput.ConsentDate = 'Unknown'
}
$checkGrantsOutput
}
Write-Progress -Activity ' Processing consented applications' -Id 2 -Completed
}
else
{
if ($ShowNonMatches) {Write-Host 'AppGrant: There are no applications that have permission via user-based consent.'}
}
}
}
function Get-FolderPermissionAdditions
{
Write-ProgressHelper -Activity 'Checking mailbox folder permissions'
$mailbox = Get-Mailbox -Identity $UserPrincipalName
#Verify mailbox auditing requirements have been met
$orgAuditState = (Get-OrganizationConfig).AuditDisabled
$mailboxAuditState = $mailbox.AuditEnabled
$mailboxOwnerAudit = $mailbox.AuditOwner -contains 'UpdateFolderPermissions'
$userAuditBypass = (Get-MailboxAuditBypassAssociation -Identity $UserPrincipalName).AuditBypassEnabled
Write-Verbose -Message "Org-level mailbox auditing disabled: $orgAuditState; Mailbox auditing disabled: $mailboxAuditState; `
Owner auditing includes UpdateFolderPermissions: $mailboxOwnerAudit; User audit bypass enabled: $mailboxAuditBypass"
if ($orgAuditState -eq $false -and $mailboxAuditState -and $mailboxOwnerAudit -and $userAuditBypass -eq $false)
{
#Checking folder permission additions covers calendar delegate additions,
#so there is no need to check for UpdateCalendarDelegation operation
$folderAuditLogs = Search-MailboxAuditLog -Identity $UserPrincipalName -LogonTypes Owner `
-Operations AddFolderPermissions -StartDate $StartDate -EndDate $EndDate -ShowDetails
if ($folderAuditLogs)
{
foreach ($logEntry in $folderAuditLogs)
{
$checkFolderPermOutput = "" | Select-Object -Property Check,User,FolderName,Assignee,Permission,Modified
$checkFolderPermOutput.Check = 'MbxFolderPermAdd'
$checkFolderPermOutput.User = $UserPrincipalName
$checkFolderPermOutput.FolderName = $logEntry.FolderName
$checkFolderPermOutput.Assignee = $logEntry.MemberUpn
$checkFolderPermOutput.Permission = $logEntry.MemberRights
$checkFolderPermOutput.Modified = $logEntry.LastAccessed #LastAccessed is returned in local time
$checkFolderPermOutput
}
}
else
{
if ($ShowNonMatches) {Write-Host 'MbxFolderPerm: There are no folders with permission added within the search window.'}
}
}
else
{
Write-Warning -Message 'Changes to mailbox folder permissions was skipped because the necessary mailbox auditing settings are not configured.'
}
}
function Get-CalendarPublishing
{
Write-ProgressHelper -Activity 'Checking anonymous calendar publishing'
#Get localized folder name
$primaryCalendarPath = Get-MailboxFolderStatistics -Identity $UserPrincipalName -FolderScope Calendar |
Where-Object {$_.FolderType -eq 'Calendar'} | Select-Object -ExpandProperty FolderPath
$calendarPublishing = Get-MailboxCalendarFolder -Identity "$($UserPrincipalName):\$($primaryCalendarPath.Substring(1))"
$checkCalPubOutput = "" | Select-Object -Property Check,User,PublishEnabled,WhenEnabled
$checkCalPubOutput.Check = 'MbxCalPublish'
$checkCalPubOutput.User = $UserPrincipalName
if ($calendarPublishing.PublishEnabled)
{
$checkCalPubOutput.PublishEnabled = $true
#Search admin audit log for publishing being enabled by owner
$auditLogPublish = Search-AdminAuditLog -UserIds $UserPrincipalName -Cmdlets Set-MailboxCalendarFolder `
-Parameters PublishEnabled -StartDate $StartDate -EndDate $EndDate
if ($auditLogPublish)
{
foreach ($logEntry in $auditLogPublish)
{
$propValue = $logEntry.CmdletParameters | Where-Object {$_.Name -eq 'PublishEnabled'} |
Select-Object -ExpandProperty Value
if ($propValue)
{
$checkCalPubOutput.WhenEnabled = $logEntry.RunDate #RunDate is returned in local time
break
}
else
{
$checkCalPubOutput.WhenEnabled = 'Unknown'
}
}
}
else
{
$checkCalPubOutput.WhenEnabled = 'Unknown'
}
$checkCalPubOutput
}
else
{
if ($ShowNonMatches) {Write-Host 'MbxCalPublish: Calendar publishing is not enabled.'}
}
}
function Get-MobileDevices
{
Write-ProgressHelper -Activity 'Checking mobile device partnerships'
$mobileDevices = Get-MobileDeviceStatistics -Mailbox $UserPrincipalName
if ($mobileDevices)
{
foreach ($device in $mobileDevices)
{
$checkMobileDevOutput = "" | Select-Object -Property Check,User,DeviceName,DeviceAgent,FirstSync,LastSync
$checkMobileDevOutput.Check = 'MbxMobileDevice'
$checkMobileDevOutput.User = $UserPrincipalName
$checkMobileDevOutput.DeviceName = $device.DeviceFriendlyName
$checkMobileDevOutput.DeviceAgent = $device.DeviceUserAgent
$checkMobileDevOutput.FirstSync = $device.FirstSyncTime
$checkMobileDevOutput.LastSync = $device.LastSyncTime
$checkMobileDevOutput
}
}
else
{
if ($ShowNonMatches) {Write-Host 'MbxMobileDevice: There are no mobile device partnerships.'}
}
}
function Get-FileSharing
{
Write-ProgressHelper -Activity 'Checking file sharing'
$operations = @('AnonymousLinkCreated','SecureLinkCreated','AddedToSecureLink')
$auditLinks = Search-UnifiedAuditLog -UserIds $UserPrincipalName -StartDate $StartDate -EndDate $EndDate `
-Operations $operations
if ($auditLinks)
{
foreach ($link in $auditLinks)
{
$checkFileSharingOutput = "" | Select-Object -Property Check,User,Operation,FilePath,Recipient,Created
$checkFileSharingOutput.Check = 'FileSharing'
$checkFileSharingOutput.User = $UserPrincipalName
$checkFileSharingOutput.Operation = $link.Operation
$checkFileSharingOutput.FilePath = $link.ObjectId
if ($link.Operation -eq 'AddedToSecureLink')
{
$checkFileSharingOutput.Recipient = $link.TargetUserOrGroupName
}
$checkFileSharingOutput.Created = $link.CreationTime #CreationTime is returned in local time
$checkFileSharingOutput
}
}
else
{
if ($ShowNonMatches) {Write-Host 'FileSharing: No files were shared within the search window.'}
}
}
function Get-TeamMemberAdded
{
Write-ProgressHelper -Activity 'Checking Team member additions'
$operations = @('MemberAdded')
$auditMembers = Search-UnifiedAuditLog -UserIds $UserPrincipalName -StartDate $StartDate -EndDate $EndDate `
-Operations $operations
if ($auditMembers)
{
foreach ($entry in $auditMembers)
{
$auditData = $entry.AuditData | ConvertFrom-Json
foreach ($user in $auditData.Members)
{
$checkTeamsMemberAddedOutput = "" | Select-Object -Property Check,User,Operation,Member,Team,Date
$checkTeamsMemberAddedOutput.Check = 'TeamMemberAdd'
$checkTeamsMemberAddedOutput.User = $UserPrincipalName
$checkTeamsMemberAddedOutput.Operation = $entry.Operations
if ($user.UPN -like '*#EXT#*') #Extract UPN from guest account
{
$id = $user.UPN.Substring(0,$user.UPN.IndexOf('#EXT#')) -replace ('_','@')
}
else #Member is internal
{
$id = $user.UPN
}
$checkTeamsMemberAddedOutput.Member = $id
$checkTeamsMemberAddedOutput.Team = $auditData.TeamName
$checkTeamsMemberAddedOutput.Date = $entry.CreationDate #CreationDate is returned in local time
$checkTeamsMemberAddedOutput
}
}
}
else
{
if ($ShowNonMatches) {Write-Host 'TeamMemberAdd: No members were added to any Team within the search window.'}
}
}
function Get-GroupMemberAdded
{
Write-ProgressHelper -Activity 'Checking Office 365 Group member additions'
#Unified audit logs do not include Group member changes, so they must be obtained
#from the AAD directory audit logs via Graph
if ($useGraphApi)
{
#Filter looks for the action of member added and the UPN of the actor is the specific user
$groupMemberAddGraphFilter = "?`$filter=activityDisplayName eq `'Add member to group`' and initiatedBy/user/userPrincipalName eq `'$UserPrincipalName`'"
Write-Progress -Activity ' Getting audit logs via Graph' -Id 2 -ParentId 1
$addedMemberLogs = Get-GraphData -queryType 'DirAudits' -filter $groupMemberAddGraphFilter
Write-Progress -Activity ' Getting audit logs via Graph' -Id 2 -Completed
#Exclude changes to Teams because they were obtained in another check
$noTeamsLogs = $addedMemberLogs | Where-Object {$_.initiatedBy.user.displayName -ne 'Microsoft Teams Services'}
if ($noTeamsLogs)
{
foreach ($entry in $noTeamsLogs)
{
$checkGroupsMemberAddedOutput = "" | Select-Object -Property Check,User,Operation,Member,Group,Date
$checkGroupsMemberAddedOutput.Check = 'GroupMemberAdd'
$checkGroupsMemberAddedOutput.User = $UserPrincipalName
$checkGroupsMemberAddedOutput.Operation = 'MemberAdded'
$modifiedGroup = $entry.targetResources.modifiedProperties | Where-Object {$_.displayName -eq 'Group.DisplayName'} |
Select-Object -ExpandProperty newValue
$modifiedGroup = $modifiedGroup.SubString(1,$modifiedGroup.Length - 2)
$addedUPN = $entry.targetResources.userPrincipalName[0]
if ($addedUPN -like '*#EXT#*') #Extract UPN from guest account
{
$addedUPN = $addedUPN.Substring(0,$addedUPN.IndexOf('#EXT#')) -replace ('_','@')
}
$checkGroupsMemberAddedOutput.Member = $addedUPN
$checkGroupsMemberAddedOutput.Group = $modifiedGroup
$checkGroupsMemberAddedOutput.Date = [datetime]($entry.ActivityDateTime)
$checkGroupsMemberAddedOutput
}
}
else
{
if ($ShowNonMatches) {Write-Host 'GroupMemberAdd: No members were added to any Office 365 Group within the search window.'}
}
}
}
function Get-Flows
{
#Flow management via PowerShell or Graph is non-existent, but an entry from the unified audit log
#includes the admin URL of the Flow for manual further review, as well as the connectors being used
Write-ProgressHelper -Activity 'Checking Flows'
$operations = @('EditFlow','CreateFlow')
$auditFlows = Search-UnifiedAuditLog -UserIds $UserPrincipalName -StartDate $StartDate -EndDate $EndDate `
-Operations $operations
if ($auditFlows)
{
foreach ($entry in $auditFlows)
{
$checkFlowsOutput = "" | Select-Object -Property Check,User,Operation,FlowUrl,Connectors,Date
$checkFlowsOutput.Check = 'FlowEdit'
$checkFlowsOutput.User = $UserPrincipalName
$auditData = $entry.AuditData | ConvertFrom-Json
$checkFlowsOutput.Operation = $auditData.Operation
$checkFlowsOutput.FlowUrl = $auditData.FlowDetailsUrl
$checkFlowsOutput.Connectors = $auditData.FlowConnectorNames
$checkFlowsOutput.Date = $entry.CreationDate #CreationDate is returned in local time
$checkFlowsOutput
}
}
else
{
if ($ShowNonMatches) {Write-Host 'FlowEdit: No Flows were edited during the search window.'}
}
}
#endregion LM Check Functions
if ($StartDate -lt (Get-Date).AddDays(-30) -and $useGraphApi)
{
$warningText = 'The specified start date is more than 30 days ago. Azure AD directory audit and ' +
'sign-in activity is available for the last 30 days with P1/P2 licenses. O365 Group member ' +
'changes and application sign-in history may be incomplete.'
Write-Warning -Message $warningText
}
if ($useGraphApi)
{
$accessToken = Get-AccessToken
}
$step = 0
$totalSteps = 10
$cmr = Get-MailboxRules
$cof = Get-OWAForwarding
$cfp = Get-FolderPermissionAdditions
$ccp = Get-CalendarPublishing
#Mobile device partnership isn't actually persistence, but can
#be uncommented to show partnerships, particularly new ones
#$cmd = Get-MobileDevices
$cac = Get-Consents | Sort-Object -Property ConsentDate -Descending
$cfs = Get-FileSharing
$ctm = Get-TeamMemberAdded
$cgm = Get-GroupMemberAdded
$cfe = Get-Flows
if ($PassThru)
{
$cmr
$cof
$cfp
$ccp
$cmd
$cac
$cfs
$ctm
$cgm
$cfe
}
else
{
$cmr | Format-List
$cof | Format-Table
$cfp | Format-List
$ccp | Format-Table
$cmd | Format-Table
$cac | Format-Table
$cfs | Format-Table
$ctm | Format-Table
$cgm | Format-Table
$cfe | Format-List
}