Get ActiveSync device statistics faster

Get-MobileDeviceStatistics is an “expensive” cmdlet, in that it requires Exchange to connect to the server where the mailbox is located and get information that is stored in the mailbox. And for whatever reason, it is more expensive than other cmdlets that do the same thing, like Get-MailboxFolderStatistics. If you have Exchange servers in multiple sites, running Get-MobileDeviceStatistics from a server in a different site than the target mailbox, it can take minutes to get data back.

A customer has about 25,000 mailboxes on servers in the US, Europe, and APAC. They wanted to find out which users’ mobile devices have synced in the last 30 days and information about them. Running something like Get-Mailbox -resultsize unlimited | %{Get-MobileDeviceStatistics -Mailbox $_.Identity} is not efficient in such an environment. You end up making expensive calls to remote servers for users that don’t even have a mobile device. The customer’s script would eventually just time out because of network issues with disconnected sessions.

I wrote a script that completes in far less time because it connects directly to a user’s mailbox server to execute the cmdlet. To be efficient processing tens of thousands of users, the script checks whether a user has any ActiveSync partnerships so it doesn’t waste time querying a mailbox that will return no data, keeps track of which server a mailbox database is mounted, establishes a connection to a server only as needed, and imports only the one cmdlet that will be executed (which completes much faster than importing every cmdlet the admin’s RBAC roles provide).

Getting mobile device statistics for this many users still takes several hours to complete, but it does complete. The script uses progress bars to indicate how far along it is in processing all mailboxes, as indicating when it is looking up the active server for a database and when connecting to a server (though the latter two only take a few seconds each).

For those that wonder why I didn’t use Invoke-Command and avoid wasting time importing the remote session, I originally wrote this in the customer’s VDI on a Windows 7 workstation with PowerShell 2, which wouldn’t let me execute the command directly in the remote session because of the Exchange WinRM configuration of restricted language mode when sending local variables to be used in a remote session. This only happened with Powershell 2. On a Windows 10 client with PowerShell 5.1, it works fine. I measured the run time of the script several times with a sample of users and compared it to doing the same with Invoke-Command, and the difference was negligible. However, if you prefer to do it that way, here is a version that uses it:

PowerShell module for searching and restoring items in Recoverable Items

A recent addition to the Exchange administrator’s arsenal in Exchange Online is the ability to search and restore items located in the Recoverable Items folder of a mailbox, via Get-RecoverableItems  and Restore-RecoverableItems .  (I don’t find that it is documented yet, so I can’t link to cmdlet references.)  It is available only for Exchange Online and has other constraints, so I wrote a module that adds support for Exchange on-premises and additional features:

Module Native cmdlets
Supports Exchange Online mailboxes Yes Yes
Supports Exchange on-premises mailboxes Yes No
Supports archive mailboxes Yes No
Search in Deleted Items folder No Yes
Search in Deletions folder Yes Yes
Search in Purges folder Yes No
Search filter can use retention tag Yes No
Restore to original folder Yes Yes
Restore all item types Yes No

To avoid naming conflicts, my cmdlets are Get-MailboxRecoverableItems  and Restore-MailboxRecoverableItems .  The EXO cmdlets use native access to the store and require you to have the Mailbox Import Export role assigned to use them.  My module uses EWS and requires either full access or the impersonation right.  (Include the UseImpersonation parameter when you want to use the latter.)  If using on-premises, you can omit the Credential  parameter to use your current credentials.  If using Exchange Online (or to use explicit credentials on-premises) you need to use the Credential parameter to provide a credential object.

My cmdlets replicate the behavior of the native cmdlets as much as possible, such as the property names and format of the output:

  • SourceFolder is where the item is currently located.
  • If the item is stamped with the MAPI property that contains information about the folder it was in when it was deleted, the “short” folder ID is displayed in LastParentFolderId.  (Otherwise, it will have no value.)  This is not the complete entry ID for the folder, but is what is stored in the property, hence why I am calling it short.  (To be restored to that folder, if it still exists, requires building the complete ID, which the cmdlet will take care of.)
  • LastParentPath is where the item will be put if you restore it.  (This is why I mentioned I am replicating the behavior of the native cmdlets, because I wouldn’t have named the property that.)  This path will be the original folder if the LastParentFolderId is populated and that folder still exists, as indicated by the value of OriginalFolderExists.  Otherwise, it will be the path to the default folder of the item’s class.

Because of a bug in EWS when translating folder entry IDs in the archive mailbox, items restored from the archive mailbox will always be put in the primary mailbox’s default folder for the item’s class.  OriginalFolderExists will never have a value for items in the archive mailbox because the translation bug makes it impossible to determine if the original folder still exists.

You can’t pipe the output of Get-MailboxRecoverableItems  to Restore-RecoverableItems  (nor can you do so with the native cmdlets).  The Restore cmdlet takes the same arguments as the Get cmdlet.  You can modify the search filter for the restore based on the output of Get-MailboxRecoverableItems , including specifying an item entry ID or folder entry ID, but the Get cmdlet is essentially the same as running the Restore cmdlet with the WhatIf  parameter.

The default is to search just the Deletions folder of Recoverable Items (named, confusingly, RecoverableItems), but you can optionally specify any or all of the Purges folder, the archive mailbox’s Deletions folder, and the archive mailbox’s Purges folder.  (The cmdlet will silently skip the request to search an archive mailbox if there isn’t one, allowing you to pipe multiple mailboxes to the cmdlet without regard for whether any or all have archives.)  There are no restrictions on which parameters you use for a search filter (aka, there are no parameter sets), but using some combinations won’t be of value.  For example, providing an entry ID negates any value of also specifying a subject.

You can then run Restore-MailboxRecoverableItems  with the parameters you want to restore any or all of the matching items:

  • RestoreToFolderId is the short folder ID where the item has been placed.
  • WasRestoredToOriginalFolder will be True if the original folder was known and still exists, False is the original folder was known but no longer exists or if the original folder was not known.
  • WasRestoredSuccessfully will be True if the item was actually moved to the folder listed in ReturnedToFilePath, or False if an error occurred.
  • ReturnedToFilePath is the folder path where the item can now be found.

You can set whether to use autodiscover and, if not, the EWS URL at the top of the module.  (You can also enable SCP lookup, if using autodiscover, by setting the property on line 41.)  There are comments throughout if you want to see what is being done and why.  Download the module below:

  RecoverableItems.psm1 (26.3 KiB)

Find mailbox folders with recently changed content

Mailbox settings can be stored in a number of places inside a mailbox.  A number of my scripts use Exchange Web Services to manipulate these settings, usually when there isn’t another way for an admin to manage them on behalf of a user.  An example is Office 365’s app launcher, which is currently being updated to v3 for tenants.  Because the method of managing the v2 launcher doesn’t work with v3, I had to try and find where the settings are stored.  The first step in doing that is changing a setting the way a user does (in this case, OWA) and then looking for changed folders as an indication that the setting is stored somewhere in one of them.  I decided to share how I do that.

The folder property PR_LOCAL_COMMIT_TIME_MAX (0x670A) stores the last time an item in the folder has changed.  This can be used in a search filter to quickly find all folders that have changed since a specific time.  First, I define all the MAPI properties I am going to be using in a search filter or in the results:

For efficiency, you usually only want to return as many properties as you will be using in some way.  (It is easier/simpler, though, to return the first class properties, when you will be using a lot of the common properties.)  So I define a property set to return only what I need:

After creating a folder view and adding the property set to it, I need to create a search filter.  This filter gets all folders (that aren’t search folders) where the last commit time is newer than a date and time:

Next, I connect to the mailbox’s root folder because I want to search all folders in the mailbox, not just the ones the user can see, and execute a search:

I then loop through the results.  First class properties, even if you manually add them to a property set, can be referenced by the object’s property name, e.g., $folder.DisplayName, but all other properties (known as extended properties) are collectively stored in another property.  You have to attempt to retrieve a defined extended property from this collection.  To do this, you have to define a variable in which the value of the extended property will be stored.  If you don’t, you will get an error.  Then you call the TryGetPropertymethod, specifying the defined property you want and, by reference, which variable you want to put its value.  For example, such as with the last commit time:

(Using the [void]  type accelerator suppresses the output of the object that is returned, which in this case is just True or False as to whether the extended property is in the collection.  It is the same as piping the command to Out-Null .)  While having the folder name is helpful, that alone doesn’t always make it clear where that folder is.  Therefore, I also get the path to the folder.  But the property stores it as a binary value, so I convert it to a string:

I put all the folders in an object, reverse sort by the last modified date, and output it to the screen:

To make it more consumable for others, I prettied it up and put it into a script.  You can download the script or copy the code below (after expanding).

  Get-FoldersWithContentChanges.ps1 (5.6 KiB)


How to pin custom app tiles on behalf of your users in Office 365

Update December 19, 2017: The process described in this post will not work with app launcher v3.  The configuration of the tiles, such as those that are pinned, is no longer stored in the user’s mailbox.  At this time there is no way (supported or unsupported) that I am aware of to manage the new app launcher for users.

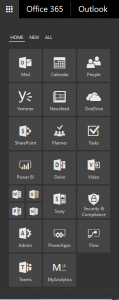
The app launcher in Office 365 is how users can quickly get to any workload no matter where they are in Office 365.  It is accessed by clicking the waffle (though I see it more as a keypad) in the upper left corner.  This image is the default tile layout for an E5 admin:

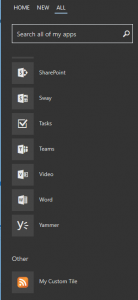
Admins can add custom tiles to the tenant that point to any URL.  These custom tiles then show up under the ALL tab for users.  Here is an example of one I added to my tenant that just points to this blog’s RSS feed (hence the icon):

You may want to not just add the tile, but also pin it to your users’ HOME tab.  Office 365 does not currently allow admins to pin tiles for users; you can only pin apps for your own account.  But that didn’t stop me from figuring out where these settings are stored and manipulating them programmatically.

App launcher settings are stored in a user’s mailbox.  This is why a user needs to have an Exchange Online mailbox in order to customize their app launcher.  The settings for the app launcher are in the PR_ROAMING_DICTIONARY property of the IPM.Configuration.Suite.Storage message at the root folder of the mailbox.  EWS has a class for working with user configuration settings that are stored in a dictionary property, so you don’t have to manually work with the binary property.  Using PowerShell and the EWS Managed API, get the value of this property (the credentials and email address of the mailbox have already been assigned to variables):

The Dictionary property contains a hash table:

and the app launcher settings are stored in the value for a key name of Suite/AppsCustomizationDataTEST.  Because the settings are stored as JSON, let’s convert them to a custom object:

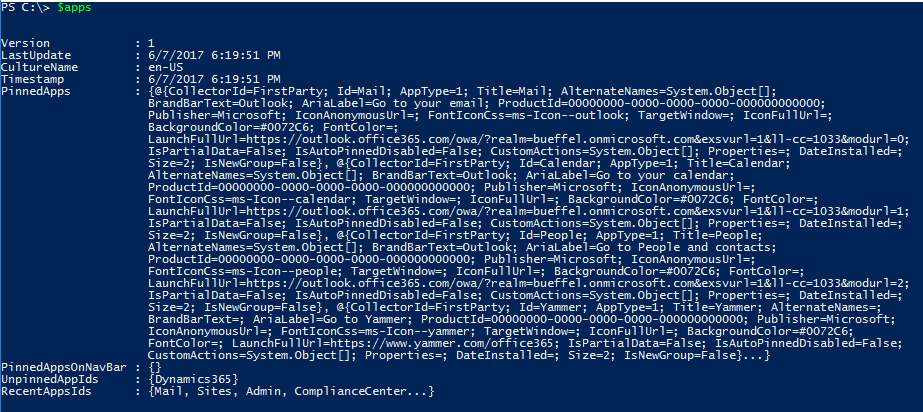
You can see that the all tiles for the Home tab are in a property called PinnedApps, which are themselves stored as custom objects. Here is the first one:In order to pin a tile, you need an object for the one you want to pin.  The easiest way to do this is to manually pin a tile in your app launcher, then use EWS to get that tile object.  Pinning a tile/app adds it to the end of the Home tab as the last item in the collection so, assuming you don’t move it after that, it will be the 24th item in the collection (index 23).  I assigned that item to a variable, so this is the object that will be added to other users’ pinned apps:

The collection of pinned apps is a fixed array, so to add a new item to it, copy the existing array to a new one plus the object for the custom tile.  Then convert the app settings object back to JSON, update the dictionary hash table with the new object, and save the changed user configuration setting back to the server:

If the user is already logged in, refresh the browser and open the app launcher to see the newly added tile:

You can modify the above code to loop through any number of mailboxes and add the custom tile object to their app launcher.  You can also manipulate the size and placement of the tile if you want, but my example is to show you how it can be added.  It should be noted that, while all of this does work, it is unsupported, so programmatically customize at your own risk.

Rio Receiver software can’t read Unicode ID3 tags

I have four Rio Receivers, which use Rio’s Audio Receiver Manager software on a host PC to serve music. Over the years, certain tracks wouldn’t be listed in the database. I had looked at the encoder used, what ID3 tags were present, coexistence of v1 and v2.x tags, filenames. But I couldn’t figure it out.

I have since tried several of the alternate ARM programs out there: MediaNet, JReceiver, rioplay, and there may have been one or two others. But I could never get any of them to work. I got close recently with JReceiver, but instructions that date back to 2003 do not account for today’s versions of the various components.

I decided to take another look at why some tracks don’t show up in the database. Forum postings indicate it should have no problem with ID3v2.x. All of my tracks have v2.3 and no v1.x tags. And most tracks are indexed fine. So I started reading about the history of ID3, the details of the different versions, and notable incompatibilities such as Windows Media Player 12 still won’t read v2.4 tags.

The text encoding available in ID3v2 made me think because I know of some programs can’t read a Unicode text file; it must stored in ANSI. So referred to my tag editing program, Tag & Rename, and there is a setting for enabling the writing of v2 tags in Unicode. But if a tag is in Unicode format, T&R doesn’t indicate this; only when a tag is rewritten will it use the appropriate format based on the setting.

I used a different tagging application, Kid3, to show which tags are in what format (down to individual tags in a track). I tested with a track and encoded all relevant fields (artist, title, album) in Unicode. When I indexed it in ARM, it didn’t show up. I used Kid3 to change the tags to ISO-8859-1, indexed again, and voila! I did further testing and determine that if you format, say, title in Unicode but the artist in ISO-8859-1, the artist will show up in the database, but not the song underneath the artist. So ARM still reads all the tags in a track; it is just those that are encoded in Unicode are not added to the database (the individual tags).

Since I am not trying to use international characters sets there is nothing really to be gained by storing in Unicode. I have asked the developer of T&R to add the ability to see what format a given tag is in (similar to Kid3), but in the meantime I have been rewriting my tags without the Unicode setting enabled as I check for album art in my tags.