Articles in the "Outlook Travel Time Appointments" series
- Add travel time appointments in Outlook
- New form for creating travel time appointments in Outlook [This article]
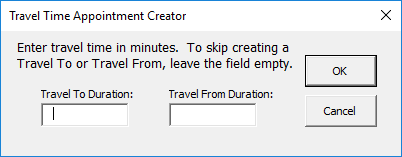
I still use my code to create travel time appointments in Outlook. I updated it a little while ago, though, to streamline it. It now uses a VBA form to ask for the travel from and travel to times in one dialog:
This saves a little real estate in the ribbon because now you only need one button:
It also saves time because you can have it create both appointments in one go. If you don’t need the to or from appointment created, leave its field blank. You can download the two form files below, extract them anywhere, then in the VBA editor you can click File->Import File… and select the .frm file.
 TravelTimeForm.zip (1.6 KiB)
You can copy the updated macros below and paste them into ThisOutlookSession in the VBA editor (and delete the macros from the old version). The OpenOutlookFolder macro hasn’t changed, but is included for convenience. The CreateTravelAppointment macro is now called CreateAppointment and the only change is that it sets the appointment’s category to Travel. The CreateTravelToAppointment and CreateTravelFromAppointment macros are now combined into one called CreateTravelAppointment. This is the macro you want your ribbon button to execute.
|
1 2 3 4 5 6 7 8 9 10 11 12 13 14 15 16 17 18 19 20 21 22 23 24 25 26 27 28 29 30 31 32 33 34 35 36 37 38 39 40 41 42 43 44 45 46 47 48 49 50 51 52 53 54 55 56 57 58 59 60 61 62 63 64 65 66 67 68 69 70 71 72 73 74 75 76 77 78 79 80 81 82 83 84 85 86 87 88 89 90 91 92 93 94 |
Function OpenOutlookFolder(ByVal strPath As String) As Object Dim objSession As NameSpace Dim arrFolders As Variant, varFolder As Variant, bolBeyondRoot As Boolean Set objSession = Outlook.Application.GetNamespace("MAPI") On Error Resume Next Do While Left(strPath, 1) = "\" strPath = Right(strPath, Len(strPath) - 1) Loop arrFolders = Split(strPath, "\") For Each varFolder In arrFolders Select Case bolBeyondRoot Case False Set OpenOutlookFolder = objSession.Folders(varFolder) bolBeyondRoot = True Case True Set OpenOutlookFolder = OpenOutlookFolder.Folders(varFolder) End Select If Err.Number <> 0 Then Set OpenOutlookFolder = Nothing Exit For End If Next On Error GoTo 0 Set objSession = Nothing End Function Sub CreateAppointment(path, subject, starttime, duration, setreminder) Dim objCalFolder As Outlook.Folder Dim objCalItem As Outlook.AppointmentItem 'Get folder object for given path Set objCalFolder = OpenOutlookFolder(path) 'Create appointment item and set properties Set objCalItem = objCalFolder.Items.Add objCalItem.subject = subject objCalItem.Start = starttime objCalItem.duration = duration objCalItem.BusyStatus = olOutOfOffice objCalItem.Categories = "Travel" 'Don't set reminder for return travel time If setreminder = False Then objCalItem.ReminderSet = False End If objCalItem.Save Set objCalItem = Nothing Set objCalFolder = Nothing End Sub Sub CreateTravelAppointment() Dim objExplorer As Outlook.Explorer Dim objSelection As Outlook.Selection Dim objSelectedAppointment As Outlook.AppointmentItem Dim strFolderPath As String, intMinutes As Integer, dtStartTime As Date, strSubject As String Dim TravelTimeTo As Integer, TravelTimeFrom As Integer 'Get currently selected appointment item and the calendar it is in Set objExplorer = Outlook.ActiveExplorer Set objSelection = objExplorer.Selection 'Get path to current calendar folder (allows for working with non-default and additional calendars) strFolderPath = objExplorer.CurrentFolder.folderPath If objSelection.Count <> 1 Then noItem = MsgBox("You must first select an appointment item.", vbCritical, "No item selected") Else Set objSelectedAppointment = objSelection.Item(1) 'Display form to get travel time durations TravelTimeForm.Show TravelTimeTo = TravelTimeForm.TravelToTextBox.Value TravelTimeFrom = TravelTimeForm.TravelFromTextBox.Value 'Create travel time appointments only if value provided If TravelTimeTo >= 0 Then dtStartTime = objSelectedAppointment.Start - TimeSerial(0, TravelTimeTo, 0) strSubject = "Travel to " & objSelectedAppointment.subject Call CreateAppointment(strFolderPath, strSubject, dtStartTime, TravelTimeTo, True) 'Disable reminder because travel appointment has one objSelectedAppointment.ReminderSet = False objSelectedAppointment.Save End If If TravelTimeFrom >= 0 Then dtStartTime = objSelectedAppointment.End strSubject = "Travel from " & objSelectedAppointment.subject Call CreateAppointment(strFolderPath, strSubject, dtStartTime, TravelTimeFrom, False) End If Unload TravelTimeForm End If Set objSelectAppointment = Nothing Set objSelection = Nothing Set objExplorer = Nothing End Sub |


The icon (ribbon button) has to be added manually by customizing the ribbon.
1. Right-click anywhere in the ribbon and select Customize the Ribbon…
2. In the Customize the Ribbon drop-down, select All Tabs.
3. Scroll down to Calendar Tools and expand Appointment.
4. Select Appointment, click the New Group button, then click the Rename button and give the group a meaningful name.
5. Select the new group name, then in the Choose commands from drop-down in the upper left, select Macros.
6. Select the macro that ends with CreateTravelAppointment and click the Add button. (I have the macro already added, along with another button for a macro, so you will just see the one entry under the new group.
7. Click the Rename button, then type a display name for the button and select a desired icon.
8. Click OK, then OK.
9. In your calendar, select an appointment. The ribbon will change to Calendar Tools and automatically switch to the Appointment or Meeting tab depending on the type of item selected. You will see the new group as the right-most group, with your macro button in it.
Scott
Hello,
First of all thanks for your solution. I tried but I couldn’t visualize the icon. When I checked the TravelTimeForm code It isn’t include the first 15 lines. Could you please help me? Thanks again